Your PhotoShelter for Brands Portal is designed to make it easy for your stakeholders to browse and search your visual media library, so they can find exactly what they need in a snap.
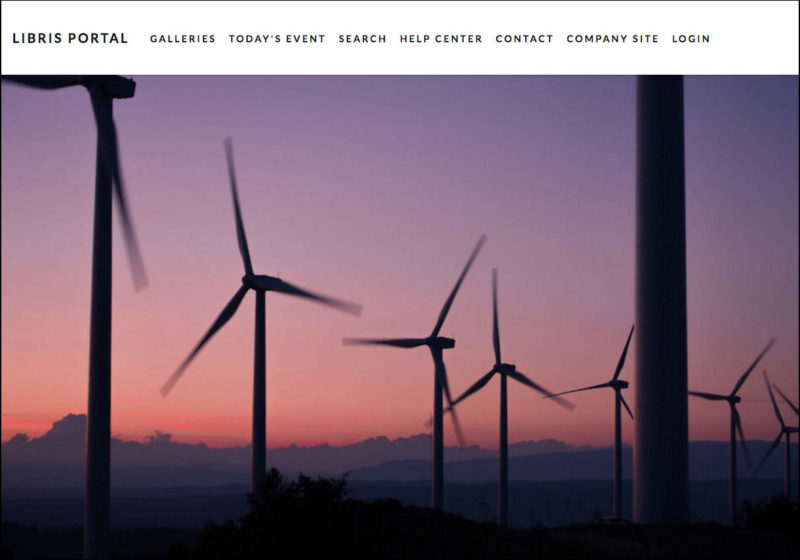
But, what if you could change how users browse your Portal to fit their needs—like hiding items from the navigation bar and adding a link to your website or social media accounts instead?
Now you can make it even easier for your users to find what they need with the PhotoShelter for Brands Portal Custom Navigation feature update.
Related Content: Read the full help article for step-by-step instructions.
With this refreshed Portal experience and the added ability to add your logo and colors, PhotoShelter for Brands users now have endless opportunities to customize the look and feel of their media libraries.
Below, learn five ways your team can improve the user experience for your internal and external DAM users.
5 Ways to Use Custom Navigation
1. Link to Your Brand’s Website
Add a custom link to your main website so Portal users can navigate easily between your visual media library and your official brand website.
You may also want to add a link to your blog or your social media channels. With this new feature, it’s easy to add and remove custom links in the navbar, so you can test out what works for your users.
Pro Tip: Build custom links and use Google Analytics to track traffic from your media library to your main website or your blog.
2 – Create Featured Galleries
Create a featured public gallery to highlight photos and videos while they’re trending.
Featured galleries allow you to steer your stakeholders toward the right content immediately. Rather than having to search or browse for the gallery they need, you can directly link to it in the navigation bar.
Here are some ways different organizations and industries have used this feature in practice:
- Sports teams use featured galleries to share game highlights right after the buzzer.
- A media agency covering an award show or a media team covering a concert can create a gallery of selected images from a live event shortly after they make in-camera edits. Creating a custom navigation bar item that links to a publicly visible gallery of selects allows internal and external stakeholders, and influencers to access the content instantly.
- Universities use custom navigation bar links to featured galleries to guide users toward photos of move-in day since they have so much energy and showcase the on-campus community coming together to welcome new students.
- Destination marketing organizations direct users to landscape or event photos, and occasionally they’ll run contests that collect content from an FTP-enabled site to populate their public galleries.
- Nonprofits can highlight photos and videos to go with their current fundraising campaigns.
No matter your industry, your stakeholders will love using featured galleries to find photos and videos of a newsworthy event immediately.
Pro Tip: Speed up your workflow by creating hidden custom links before your big event. Once your photos and videos have been uploaded to your PhotoShelter for Brands account, all you have to do is drag the hidden link over to the “Visible Nav Items” column.
Pairing this trick with a real-time image workflow, like the Purdue Athletics in-game workflow, will help your stakeholders get content in a flash.
3. Link to a Custom Contact Form
Hide the existing Contact system link and create a custom contact form to fit your team.
Build a form on your platform of choice and ask for whatever information you need from stakeholders. For example, you may just need their name and email so you can make them an Invited User, or you may want to ask for more information about why they want to use your images.
Then, add a new “Contact” custom link (just like we did in the last two sections) directing users to the new custom form.
Pro Tip: You will be able to hide, but not delete, the existing Contact link because it’s a PhotoShelter for Brands system link. You can always go back to the original contact form.
4. Build a Gallery of Help Documents
Create a gallery of helpful materials so your visitors can easily navigate your Portal (and follow your team’s rules and guidelines) from the first time they visit. Just add PDF help documents and any useful videos or screenshots to a public gallery, then add a custom link to the gallery in the navbar.
You can also create a page on your main website that outlines how to use the Portal and your usage rights policies, like Visit Greenland.
Pro Tip: In your gallery of helpful materials, be sure to include your metadata policy so stakeholders know which search terms are most important and relevant.
5. Invite People to Sign Up for Your Newsletter
Add a link in your navigation bar to sign up for your newsletter to capture the email addresses of visitors engaging with your public Portal. How? Add a custom navigation item and title it ‘Newsletter,’ then link it to your company’s email marketing signup page.
Pro Tip: Keep your Portal open in a separate window while you’re working on the Portal Navigation page. Refresh the other window to see the changes live on your Portal as you go.
How Will You Use Custom Navigation?
We can’t wait to see how your team uses custom navigation! Head into your PhotoShelter for Brands account to try it out, and keep us posted on how you’re making it work for your team!