Modern digital cameras generate gigantic files whose dimensions far exceed the typical online size requirements. The same holds true for modern smart phones and images that you might purchase from online stock marketplaces.
While you should always keep a high resolution file in your DAM (digital asset management) system, you might need to resize the image for use in a blog, brochure, or social media post. And in many cases, spending hundred of dollars for a copy of Photoshop doesn’t make much sense.
Before we give you a few options for resizing a photo, here are a few considerations.
Watch your Compression setting
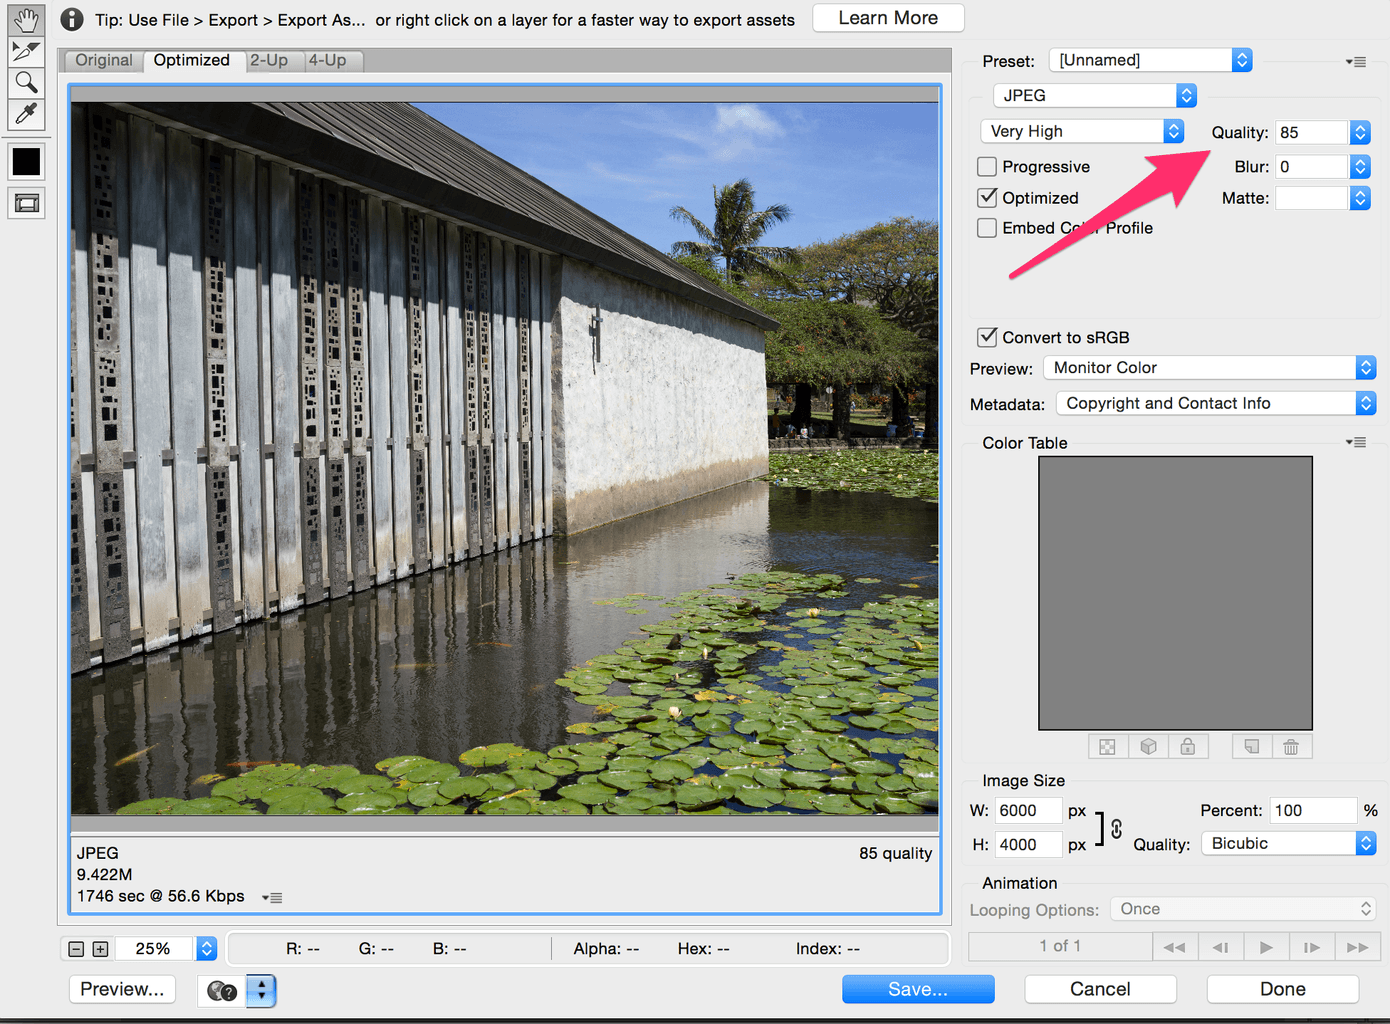
Nearly all the photos you see online are saved in the JPG format, which reduces file size by sacrificing image quality. Most software allows you to choose your compression setting (curiously on a scale from 1-12 or 1-100), and you typically want to be in the upper range (e.g. >= 80%) to ensure your photos look crisp. Finding an image compression tool that gives you this result will always be beneficial to you, especially if you are uploading to social media.
If you’re posting images to social media sites, you should also be aware that they might further compress your photos. All the more reason to upload a high quality image.
Most Blog Software Auto-resizes
If you’re using blog software like WordPress, it will typically resize your images for you. The only thing you gain by pre-sizing an image is saving a little bit of time upon uploading.
Here are a few options for resizing your images online:
What Size Do I Really Need?
This is where the answer becomes a little confusing. A decade ago, most computers had a standard number of pixels per inch (you can think of a pixel as the smallest little dot of light your computer monitor can display). On Windows, the default was 96ppi. On Mac it was 72dpi. The past few years has given rise to Retina-style displays where the number of pixels per inch can rise well above 400ppi, which results in a much sharper image.
The other development is the rise of “responsive design,” which is a online design philosophy that lays out images and text based on the size of your browser window. In responsive design, the browser handles the resizing of images automatically, but it does mean that you’re typically uploading a much larger image than you might have in the past. How big do you need? The answer depends on how you intend to display the image now more than ever.
On the Desktop
Preview comes free with OSX and offers an easy way to resize.
- Open a photo in Preview
- Go to Tools -> Adjust Size
- Enter your desired dimensions and make sure you’ve select the correct units (pixels or inches)
- If you’re dealing with pixels, the Resolution (pixels/inch), doesn’t matter. A 1000 pixel image is still 1000 pixels irrespective of the pixel resolution.
- Check “Scale proportionally” and “Resample image”
Paint comes free with all versions of Windows.
- Open a photo in Paint
- Under the Home tab, click the “Resize” tool
- Select “Maintain aspect ratio”
- You can resize an image by a percentage or by pixel dimensions
- Click the paint button, and select “Save as”
In the Cloud
The cloud-based version of Pixlr gives you a simple, non-login way to resize.
- Launch the app
- Open an image from your desktop
- Click the “Adjustment” icon
- Click the “Resize” icon
- Enter your desired dimensions, and click Apply
- Click “Save” and the image will be saved to your desktop
Adobe offers a free online editor with many of the basic Photoshop functions, including resize. All you need is an Adobe account to get started.
- Launch Express Editor
- Upload a photo
- Under the Basic menu, select “Resize”
- You can click a preset or click “Custom” to enter a specific size
- Enter your desired dimensions
- Click “Done” in the lower right
- Express Editor immediately allows you to save to your computer
PhotoShelter’s DAM system gives your clients the ability to pick what size they want to download.
Apps
Strangely, many of the popular image editing apps don’t have image resizing functions. There are a slew of apps that strictly perform image resizing, and many of them have terrible user interfaces and ads. That is the price of free. Here are a few less objectionable options.
SimpleResize (IOS)
Tekunodo SimpleResize allows you to access your Camera Roll, and use either preset sizes or enter your desired dimensions. Click the Save button and you’re done!
Reduce Photo Size (Android)
This app includes rotation, cropping and image resize options in a straightforward interface.